
Just in case your browser landed you directly on this page, other articles relating to this one are
Xiegu G90 & Digital Modes – What the Digital modes are about (focusing at the moment on FT8
Xiegu G90 & the CAT Cable – Where the CAT cable comes into play and how to build one if needed
Xiegu G90 & the CE-19 & Cabling – how to build the audio cables for the CE19
XIEGU G90 & FT8 – using the WSJT-X software and the Xiegu G90 to receive FT8 (You are here)
| This page has been heavily updated with the most recent revision done 4th February 2022 |
Pre-Requisites
Hopefully, you have been going through these guides in some sort of order. However, there is also a possibility you have landed directly on this page from a search engine.
So for the benefit of everyone, you will need
- Transceiver (Xiegu G90 is what this article is about), but really any transceiver.
- CAT Control Interface for the Xiegu G90
- Computer
- Interface for your Transceiver for Audio (CE-19 in our case)
If you need t see how they are hooked up, then I recommend reading the other articles.
How do I get started with FT8 at least?
Now I want you download the following application.
Go to https://physics.princeton.edu/pulsar/k1jt/wsjtx.html. Move down the page to Installation Packages, and you should see the packages for your operating system. Download and install (in my case I downloaded wsjtx-2.4.0-win64.exe)
Ok you should now have those packages installed and we now need to prep your radio.
This table has been recently updated on 1st Feb 2022 using a Xiegu G90 Firmware 1.78b1
| G90 Modification for Digital Modes | Instruction 1 | Instruction 2 | Instruction 3 | Orig |
| > Set Mode to USB (Upper Sideband) | Keep pressing Mode Button on Top until USB shows on screen | Screen should now show USB | ||
| Turn RF gain to 50% | Press and hold AGC button for one second and release, | Screen should show RF Gain XX% | Rotate the Tuning knob until showing 50% and depress knob to set. | |
| Set MIC Gain to midrange | Momentarily press the FUNC button and the Orange LED should light up | Press POW button once and MIC Gain XX should show on Screen | Rotate the Tuning knob until showing 10 and depress knob to set. | |
| > Set Correct Line in | Momentarily press the FUNC button and the Orange LED should light up (if not already) | Press POW button twice and INPUT LINE or MIC should show on Screen | Rotate the Tuning knob until INPUT LINE is showing and depress knob to set. | |
| > Speech compression off | Click CMP Button | It will toggle a Microphone Icon near the top of screen | Click this until the Microphone Icon is not showing | |
| AGC Off | Click AGC Button | It will toggle AGC options showing at the top of screen. | Keep pressing until it shows AGC–- (so not F or S or A) | |
| Set AUX IN Volume | Press and hold the FUNC Button until screen menu pops up. Cycle with VM (Next) Button until option number 5 (AUX IN VOLUME X) shows | Rotate the tuning knob until it shows 8 | Press the CMP (Save) button | 8 |
| Set AUX OUT Volume | Press and hold the FUNC Button until screen menu pops up. Cycle with VM (Next) Button until option number 15 (AUX OUT VOLUME X) shows | Rotate the tuning knob until it shows 15 | Press the CMP (Save) button | |
| Turn Off Noise Blanker | Press NB button and will show NB SW XXX | Rotate the tuning knob until it shows OFF | Depress the Tuning Know to set | |
| Set PREamp off | Click PRE Button | It will toggle P and A and blank on Screen | Keep pressing until not showing P or A onscreen |
Now don’t get hung up on the settings too much, but concentrate on the ones with a > symbol at the front. My initial tests had these basic settings, and I still received FT8 Transmissions. However this all depends on your environment, your equipment, your noise floor in your area.
Now we need to configure the WSJT-X application to match your configuration.
Now I will state something up front. If you have read all the articles on the Xiegu G90 and Digital Modes, I recommended getting to know the FL Suite of applications. On of the benefits of the FLRig application, is that it is one of the few applications that have a configuration for the Xiegu G90. The next benefit of the WSJT-X application is while they do not have direct support for the Xiegu G90 is that they support the FLRig application as a configuration setting.
What this means is that you start up the FLRig application, minimise it, and then run WSJT-X, select the FLRig, and you have very little else to configure.
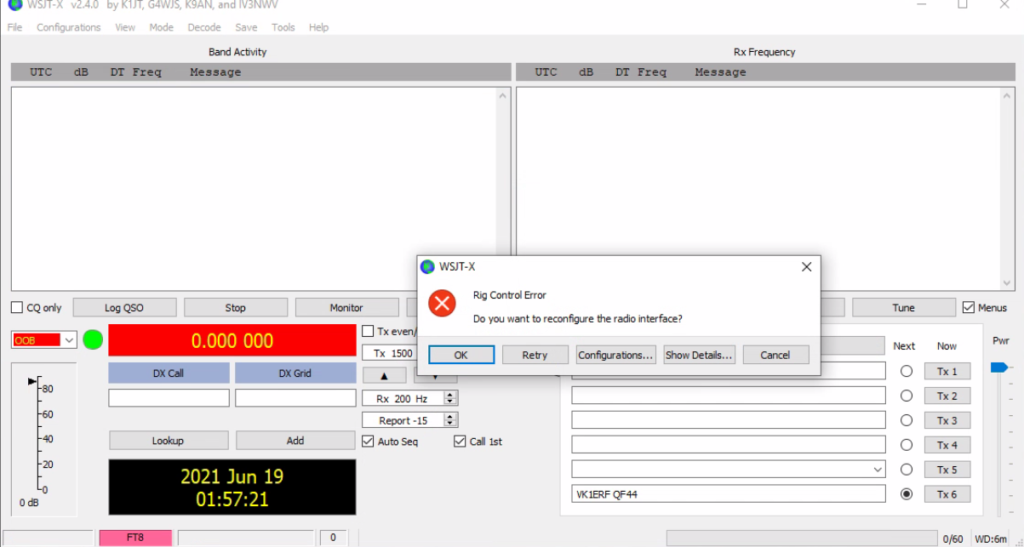
If you run the same setup, the following screens will cover what you need to configure. So when you open up WSJT-X, you will see the following screen
Click ok and you should get the next screen (with the General Tab open)
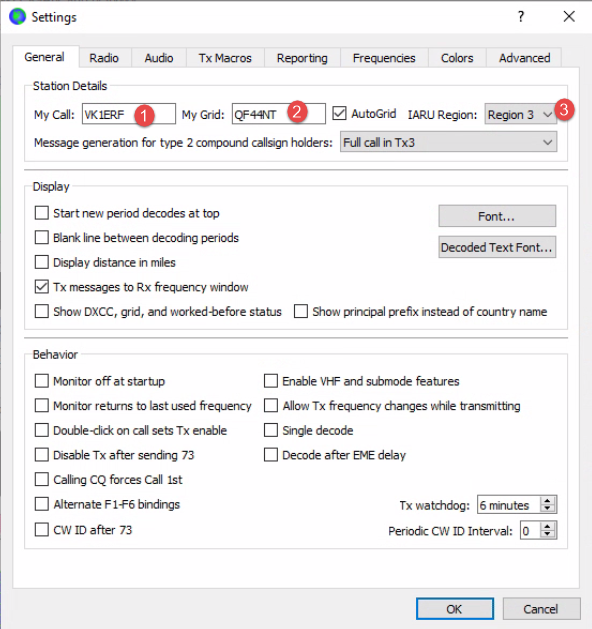
- Enter your callsign
- Your Maidenhead Grid Reference
- Your IARU region
Now Move to the Radio Tab
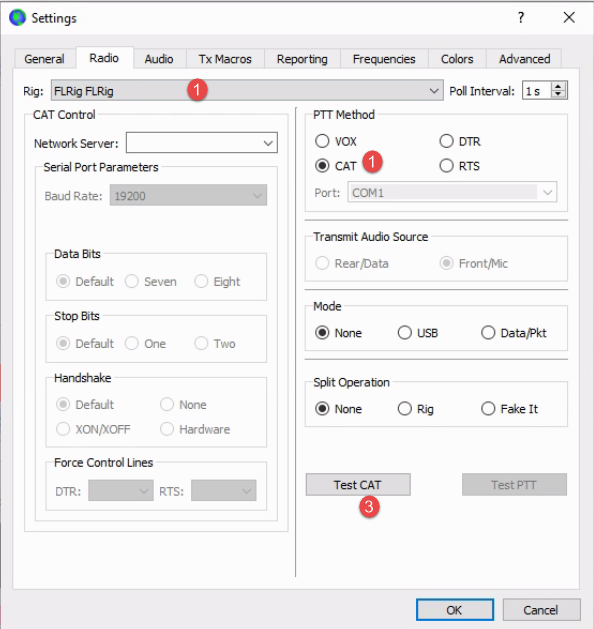
- Select FLRig
- Make sure CAT is selected
- Perform a test using the TEST CAT button
Now click on the Audio Tab
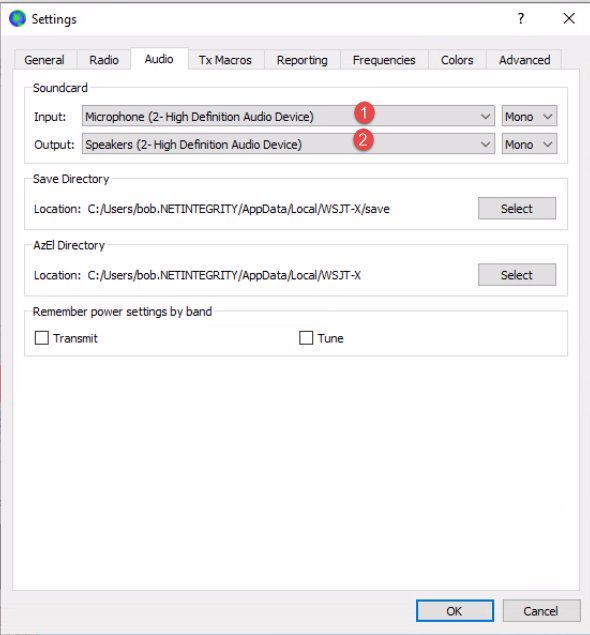
- Make sure you select the correct SoundCard input
- Make sure you select the correct SoundCard Output
At this point I should state now that I am in a compromised setup (limited space)
1 x 21mhz Horizontal Dipole about 3m high
1 x Xeigu G90 at max 10w
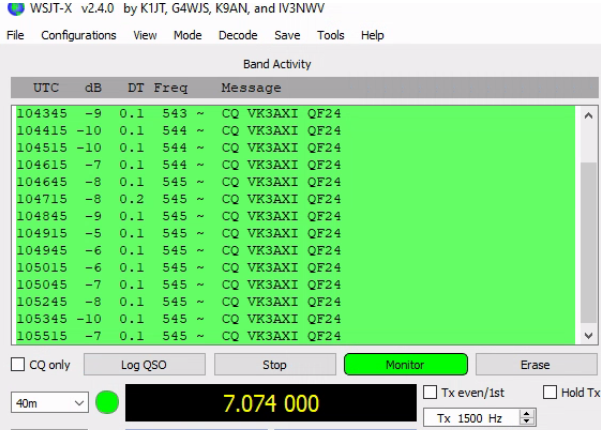
So as you can see, I am not running anything special, in fact until I get a multiband HF vertical installed I was not expecting much. So you can imagine my delight when I started receiving Japan on 40m (using the antenna tuner on the G90)
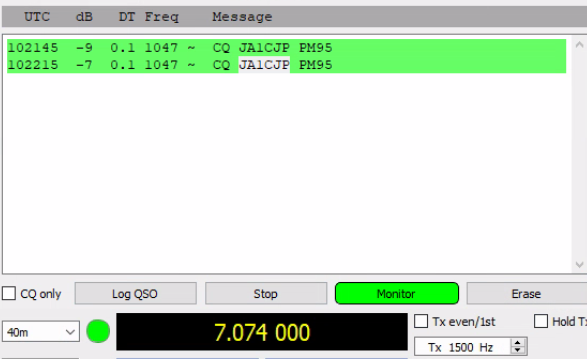
And 20 minutes later after tweaking a few settings, was getting Victoria, Australia (about 379Km).
I did not reply, as I was only testing the inbound first, but considering no effort other than the build of the cable, I was receiving digital mode communications. I still needed to understand the application and what I needed to do.
Making Improvements on your Digital Setup
Receiving
Remember, whilst the information provided here will get you going, these settings are not a case of set and forget. A lot is going to depend on your receive quality and the band you are using. And you may find you need to change these constantly.
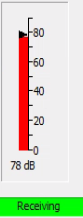 | This is what you want to try and avoid. There are two controls that you have control to correct this SET AUX OUT – Lower this a little. I suggested 15 – now try lowering down to 14 or 13 and watch the effect. Yes you can modify this while you are receiving a signal. The number will always depend on your environment, your signal quality, even your sound device (USB sound card) and Windows settings. |
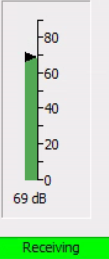 | This is typically what you are looking for. I look for 60 with the occasional peak up to 70. This setting was with SET AUX OUT Set at 14 |
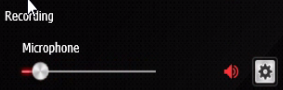 | Now there is one more control that interacts with the “WSJT-X Receiving Bar” level and that is the Microphone Control of your Sound Card or USB Sound Device. Typically I normally set this as low as possible, almost removing it from the equation. |
Transmitting
Now transmitting is a little bit different, as
| If you can leave it on full and everything is working for you. I find that I have to reduce it slightly to achieve the levels I am looking for. | |
| G90 – SET AUX IN | This is typically what you are looking for. I am for 60 with the occasional peak up to 70. This setting was with SET AUX IN Set at 6 |
 | Now there is one more control that interacts with the “Output” level and that is the Speaker Control of your Sound Card or USB Sound Device. Typically I normally set this as low as possible, almost removing it from the equation, however unlike the Microphone, this is a little more touchy. |
When you have the transmitting set well you are looking to achieve your maximum wattage (and this may be according to your licence) with the ALC slightly below 100.
 | This the sort of setting you are looking for. Now I will state that there has been a shift in the ALC number that is expected as per the latest firmware 1.78b1. How you are looking for that output wattage, if it is showing zero or near that then you need to look at the Transmitting settings above, and those three, do have a very tight relationship. |
Checking your Reception and Transmission settings.
With your reception settings, it is quite easy to check. You are looking for a nice green bar showing between 60 and 70. Pretty straight forward. Secondly this is further backed up by you receiving FT8 Transmissions. In one hour 490 CQ request messages come through, which is reasonably healthy
Checking your Transmission settings is a little harder. Change a setting here and there, and you have no feedback (at least not through the software) unless you complete a QSO, and just like voice, just because you answered a CQ does not mean you managed to get through the throngs of other operators trying to get that operator.
This is where you need to learn to use the tools available on the Internet. One in particular is https://pskreporter.info/ . Setup your G90 and make sure that you are receiving FT8 transmissions from the rest of the world (this also confirms that your Sound Card plugs are plugged in the correct way).
Now set yourself up to put out a CQ yourself. We are in fact going to leave that cycling round, so that we can make changes and look at the effect. So what this means is you should have a notepad and pen, writing down the time that you made a change e.g.
18:01:02 – Increased the sound card to 27%
18:10:04 – Lowered the PWR slider to about 90%
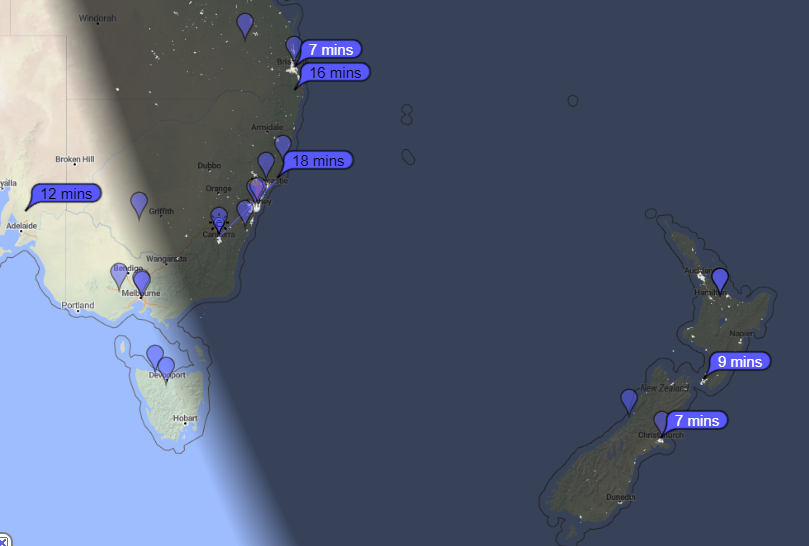
The above picture was from PSKReporter, and as you can see I was being seen but only in Australia, until I made some changes (which included dropping my PWR Slider to about 90%, and slightly increased my Speaker volume, and as you can see, New Zealand started to see my signal, providing the feedback I needed on whether changes were making a difference. This was on 40m, which is not the best once the grayline has passed.
One more thing, if you click on the locations that have seen your signal, you can get further information by clicking on the Locations that have a time next to them, and you will see further information
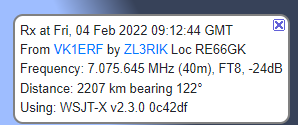
As you can see, it lists the exact frequency, signal strength, distance, bearing, the software they are using and in some cases the hardware & antenna being used. So if you are trying to find out whether a different antenna makes a difference, or changing the height, this is a great way of obtaining this information. I really recommend using this and taking the time to understand your G90 along with the WSJT-X software, and its relationship with the sound interface, so that you can get maximum enjoyment out of it.
One more important point –
One thing that can sometimes be overlooked, and that is the bandwidth setting. This is particuarly the case if you make heavy use of the filters whilst in Voice mode.
You need to allow your transceiver to receive and pass as much bandwidth as possible so that it can be processed by WSJT-X. Now my understanding is that this bandwidth is 2500Hz, so generally I make sure that the filter settings are open at 2500Hz or greater, allowing WSJT-X to see all the signals.

The default SSB filter is 2400hz, so you generally want to open it larger than this. Whilst I have 2625hz showing, generally I open it up to 2900hz (I believe)
It can be rewarding – keep trying
If you are like many, you have had a steep learning curve, but once you get the hang of it, it can be rewarding. The following picture shows PSKReporter showing all sites that were receiving my signal from Australia, however I am only on 10 watts and running a compromised 15m dipole only 2-3m from the ground.
And believe me, I am no expert, still learning just like everyone else.

Do I need a separate USB Sound card??
Well before I started, I would have said no, but after the initial receiving success on FT8, something was not quite right when I tried to transmit and respond.
So as an alternative, I went looking for the low end USB Sound adaptor that came with my Mixing unit, and plugged it in. Modified the settings in WSJT-X to use this adaptor. I also took the precaution of keeping things simpler, which meant I set WSJT-X to use the 15m Band (since my dipole was resonant on this band – without the additional step of playing with the Antenna tuner).
As you can see from the following picture, my first Digital Mode QSO on HF with the Xiegu G90.
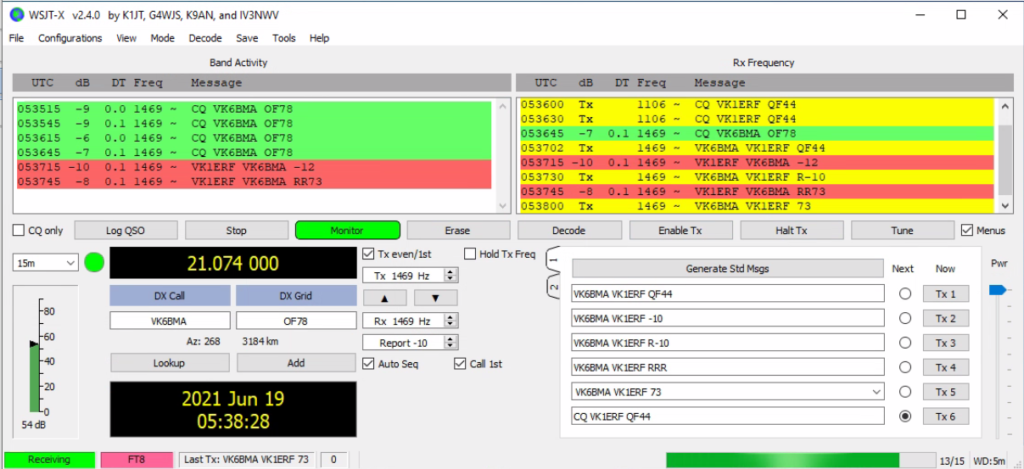
So did the use of a separate sound card adaptor make a difference? Yes I believe it did. The QSO worked exactly as I expected it should.
It also makes sense, to use a separate adapter (which only WSJT-X is configured to use), so that normal Windows sounds do not come through it. The price of the adaptor was about $7.00 (so it is nothing special). I will admit a few months later, I decided to “splash” out on Sound Blaster Play 3 which has been great, but the main thing I appreciate from the Sound Blaster is the separate Audio Control Panel giving me a little more control. I just don’t have the confidence with Windows basic drivers and the way it handles audio.
Further thoughts, comments and improvements
Wind forward a few more months and many more QSO’s, I have some additional pearls of wisdom to add.
First of all, whilst you can do it alone, it is much easier if you have someone else to work with. What I mean by this, is that one of the problems with FT8, is when it is running nicely, every knows it and it becomes very busy. This environment is not conducive to testing and learning, and you will soon become despondent as you can’t work out if it is your gear, your antenna, your software or your lack of knowledge letting you down.
With a fellow ham (particularly one that is relatively living close to you) you can both move off to a band that is not running hot, in fact not even running at all. With them on the phone, or Discord/Skype/Teams, you can learn a lot quicker. With the two of you, you can learn what a weak FT8 Signal sounds like and what a strong one sounds like. If you are fortunate, you are probably the only two local users on band, so in effect you have it to yourselves to hone your skills and understanding.
If all your equipment is configured correctly, your Antenna tuned, your fellow ham should be able to send out a CQ, and you should see it appear on your screen. Likewise, you should be able to double click on that CQ and the WSJT-X application should automatically commence the FT8 exchange that leads to a successful QSO.
Again, you can do this all alone if you wish, it is possible, but it becomes even easier to understand with two heads involved, and access to both sides of the equation.
In your early FT8 experience, you are excited to start communicating. However once past the initial excitement, I recommend putting some time aside working on your audio levels both inbound and outbound, reading the recommendations of what is expected by the software (WSJT-X in this case), as they do make a difference and record the settings for next time.
Finally, you can see above, I spoke about the USB sound device, and how a USB device made a difference. Well, I took it a step further and purchased a Creative Sound Blaster Play! 3 and there is a 4, but the 3 was at a nice price point. This I found improved things further particularly with the control panel software (as opposed to the generic Windows sound control panel) that provided more finite control on the microphone and audio out. It appears spending a few extra dollars does provide a benefit.
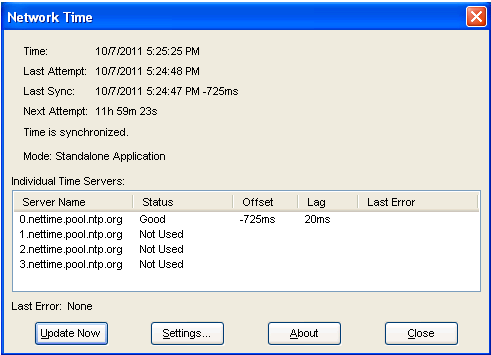
Importance of keeping your time synchronised
With DIgital Communications, it is very important that your time is accurate. It needs to be more accurate than just letting Windows handle it. For this reason, you should download the following application and install it as a service in Windows and make sure it is doing a check every 12 hours at least.

Could not find any info on your site re CAT control of the Xiegu G90 using CAT strings. I wanted to control the G90 using Flrig and HRD by setting up the software buttons on Flrig and HRD to replace some of the front panel buttons and control operation. I thought this could be of interest to people with the G90. It took me some time to figure it all out, so I have provided some examples below, if you want further information let me know..
CAT String for XIEGU-G90
Cat commands are space delimited
xFE xFE x88 xE0 { xXX xXX xXX } xFD
The required CAT commands for the radio are between the curly braces, DO NOT INCLUDE THE CURLY BRACES
Some Examples
Setting the frequency
0 1 2 3 4
xFE xFE x88 xE0 x05 x00 x00 x07 x07 x00 xFD = 07.070.00
xFE xFE x88 xE0 x05 x00 x50 x06 x07 x00 xFD = 07.065.00
xFE xFE x88 xE0 x05 x00 x00 x12 x07 x00 xFD = 07.120.00
xFE xFE x88 xE0 x05 x00 x40 x07 x07 x00 xFD = 07.074.00 FT8
xFE xFE x88 xE0 x05 x00 x40 x07 x14 x00 xFD = 14.074.00 FT8
xFE xFE x88 xE0 x05 x00 x86 x03 x07 x00 xFD = 07.038.60 WSPR
Setup for WSPR on 40m 7038.600
VFO A USB FREQ: 7038.60 Power: 1W
xFE xFE x88 xE0 x07 x01 xFD | xFE xFE x88 xE0 x06 x01 x02 xFD | xFE xFE x88 xE0 x05 x00 x86 x03 x07 x00 xFD | xFE xFE x88 xE0 x14 x0A x00 x10 xFD |
Dial Encoder LOCK ST AGC to OFF
xFE xFE x88 xE0 x16 x50 x01 xFD | xFE xFE x88 xE0 x16 x12 x00 xFD
Command String to send to the G90
xFE xFE x88 xE0 x07 x01 xFD xFE xFE x88 xE0 x06 x01 x02 xFD xFE xFE x88 xE0 x05 x00 x86 x03 x07 x00 xFD xFE xFE x88 xE0 x14 x0A x00 x01 xFD xFE xFE x88 xE0 x16 x50 x01 xFD xFE xFE x88 xE0 x16 x12 x00 xFD
Bruce, thank you for comments and indeed providing others with your G90 CAT Commands.
Your timing was quite good, as I was about to start working on an article for the website on the CAT Commands. I know that there is some work done by others, but wish to bring it all together.
As a start, would you mind if I place your work into a page on the website with appropriate credits of course.
Regards
Bob
Fine Bob, after nutting all this out I wanted to get it out there for others and I thought you might be best to do this, I have added the details again below as I added one command string being a generic digital setup. Also I have found that the ATU commands do not work, maybe the published HEX valuse are incorrect, don’t know at the moment.
Thanks Bob.
Thank you do the great tutorials. I got my G90 up and running on FT-8 this morning but ran across something odd: using flrig and wsjtx it would not transmit for the whole 15 seconds at higher than 5W power with the antenna tuner ON. I had to turn the tuner off for it to transmit for the entire time at any kind of real power. I’m curious if anyone else saw anything similar.
Martin, thanks for the comments..appreciated.
Sorry no light bulb moment in terms of an answer…..I have not had that sort of issue at all. The only thing that was close was RF being induced into the circuit, where half way through the TX session, it would drop off and stio transmitting. However, I would also realise tat FLRig had stopped responding correctly.
My fix was clip on ferrite cores on the USB/CIV lead – both ends and also on the audio lead going to (in my case) the CE19.
Whilst I am taking a guess, the fact that the higher wattage was causing you issues, leads to a conclusion you might have RF feeding back in.
I would also take a look at your grounding in terms of Power Supply / G90. I use a braid bringing all my equipment to a clear common ground (which includes my external ATU). external ATU is not used for FT8. However my internal ATU is used at all times for FT8
Regards
Bob